Compiling from source
You may want to build Open3D from source if you are developing Open3D, want to
get the latest features in the master branch, or if the OS or Python
versions are not covered by Open3D’s pre-built Python packages from PyPI and
Conda.
The basic tools needed are git, CMake, and a non-ancient C++ compiler that supports C++11, such as gcc 4.8+, Visual Studio 2015 update 3+, or XCode 8.0+. If Python binding is needed, make sure Python 2.7 or 3.5+ is installed.
Download source code from the repository.
git clone --recursive https://github.com/intel-isl/Open3D
Ubuntu
1. Install dependencies (optional)
Optionally, dependencies can be installed prior to building Open3D to reduce compilation time. Otherwise, the dependencies can also be build from source, see Dependencies.
util/scripts/install-deps-ubuntu.sh
2. Setup Python binding environments
This step is only required Python support for Open3D is needed. We use pybind11 for the Python binding. Please refer to pybind11 document page when running into Python binding issues.
2.1 Select the right Python executable
All we need to do in this step is to ensure that the default Python in the
current PATH is the desired one. Specifically,
For pip virtualenv, activate it by
source path_to_my_env/bin/activate.For Conda virtualenv, activate it by
conda activate my_env.For the system’s default Python (note:
sudomay be required for installing Python packages), no action is required.
Finally, check
which python
python -V
to make sure that the desired Python binary is used. During the CMake config
step (when running cmake ..), check the printed message indicating
Found PythonInterp. E.g. the line may look like this:
-- Found PythonInterp: /your/path/to/bin/python3.6 (found version "3.6.6")
Alternatively, CMake flag -DPYTHON_EXECUTABLE=/path/to/my/python
can be set to force CMake to use the specified Python executable.
2.2 Jupyter visualization widgets support (experimental)
Since version 0.4.0, we added experimental support for Jupyter
visualization. To enable Jupyter visualization support, install
npm. If npm is not
installed, Jupyter visualization support will not be enabled, however the rest of
the Python bindings will still work.
To check the installation:
node -v
npm -v
Tip
We recommended using modern versions of node and npm. Warning
message will be printed if the node or npm versions are too old for
the node packages that the Jupyter visualizer depends on.
Please refer to
the official documentation
on how to upgrade to the latest version.
Warning
Jupyter notebook visualization with OpenGL is still experimental Expect to see bugs and missing features.
2.3 Disable Python binding
If Python binding is not needed, it can be turned off by setting the following
compilation options to OFF:
BUILD_PYBIND11BUILD_PYTHON_MODULEBUILD_PYTHON_TUTORIALS
3. Config
mkdir build
cd build
cmake -DCMAKE_INSTALL_PREFIX=<open3d_install_directory> ..
The CMAKE_INSTALL_PREFIX argument is optional and can be used to install
Open3D to a user location. In the absence of this argument Open3D will be
installed to a system location (sudo required). For more customizations of the
build, please see Compilation Options.
4. Build
# On Ubuntu
make -j$(nproc)

# On macOS
make -j$(sysctl -n hw.physicalcpu)
5. Install
5.1 Install Open3D Python package
Inside the activated virtualenv (shall be activated before cmake),
run
# 1) Create Python package
# 2) Create pip wheel
# 3) Install Open3D pip wheel the current virtualenv
make install-pip-package
The above command is compatible with both pip and Conda virtualenvs. To uninstall, run
pip uninstall open3d
If more fine-grained controls, here is a list of all related build targets:
# Create Python package in build/lib/python_package
make python-package

# Create pip wheel in build/lib/python_package/pip_package
make pip-package

# Create conda package in build/lib/python_package/conda_package
make conda-package

# Install pip wheel
make install-pip-package
If the installation is successful, we shall now be able to import Open3D
python -c "import open3d"
5.2 Install Open3D as a C++ library
To Install/uninstall the Open3D as a C++ library (headers and binaries):
cd build
make install
...
make uninstall
Tip
sudo may be needed to install Open3D to a system location.
To link a C++ project against the Open3D C++ library, please refer to Create C++ project, starting from this example CMake file.
MacOS
The MacOS compilation steps are mostly identical with Ubuntu.
1. Install dependencies (optional)
Run util/scripts/install-deps-osx.sh. We use homebrew
to manage dependencies. Follow the instructions from the script.
2. Setup Python binding environments
Same as the steps for Ubuntu: 2. Setup Python binding environments.
3. Config
Same as the steps for Ubuntu: 3. Config.
Alternatively, to use Xcode IDE, run:
mkdir build-xcode
cd build-xcode
cmake -G Xcode -DCMAKE_INSTALL_PREFIX=<open3d_install_directory> ..
open Open3D.xcodeproj/
5. Install
Same as the steps for Ubuntu: 5. Install.
Windows
On Windows, only Visual Studio 2015 update 3 and newer are supported since Open3D relies heavily on C++11 language features.
1. Dependencies
For easy compilation, we have included source code of all dependent libraries
in the 3rdparty folder. Therefore, we don’t need to install any dependencies.
2. Setup Python binding environments
Most steps are the steps for Ubuntu: 2. Setup Python binding environments.
Instead of which, check the Python path with where python, also pay
attention to the Found PythonInterp message printed by CMake.
3. Config (generate Visual Studio solution)
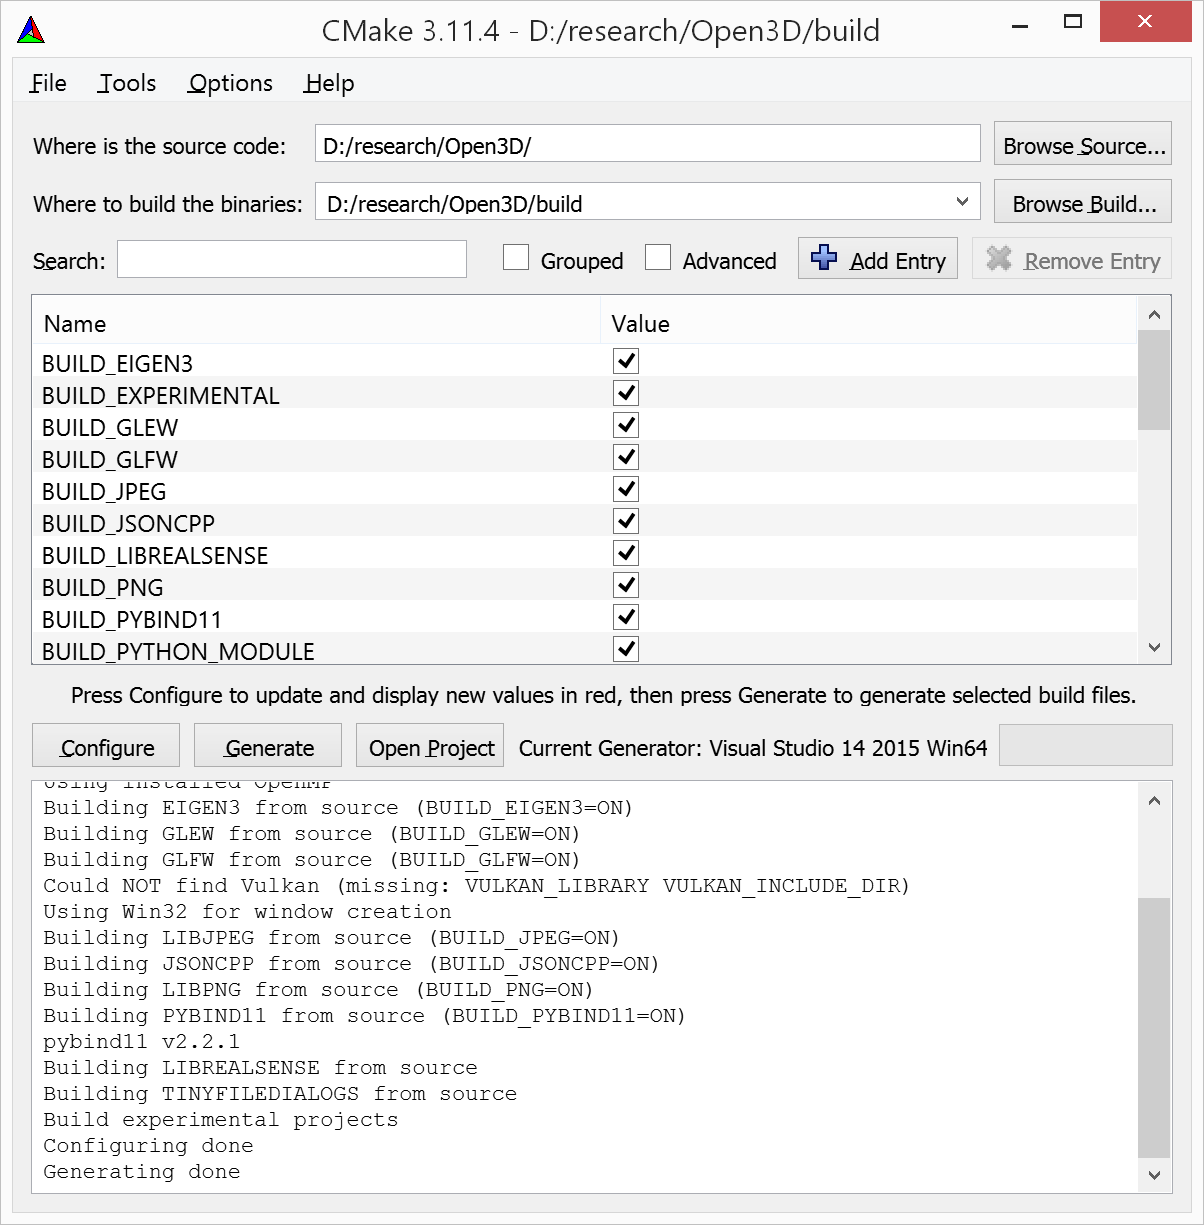
The CMake GUI is as shown in the following figure. Specify the
directories, click Configure and choose the correct Visual Studio
version (e.g., Visual Studio 14 2015 Win64), then click Generate.
This will create an Open3D.sln file in the build directory.

Alternatively, this file can be generated by calling CMake from the console:
mkdir build
cd build
cmake -G "Visual Studio 14 2015 Win64" ..
Error
If cmake fail to find PYTHON_EXECUTABLE, follow the Ubuntu guide:
2. Setup Python binding environments to activate the Python virtualenv before running
cmake or specify the Python path manually.
By default, CMake links with dynamic runtime (/MD or /MDd). To link with
static runtime (/MT or /MTd) set -DSTATIC_WINDOWS_RUNTIME=ON.
4. Build
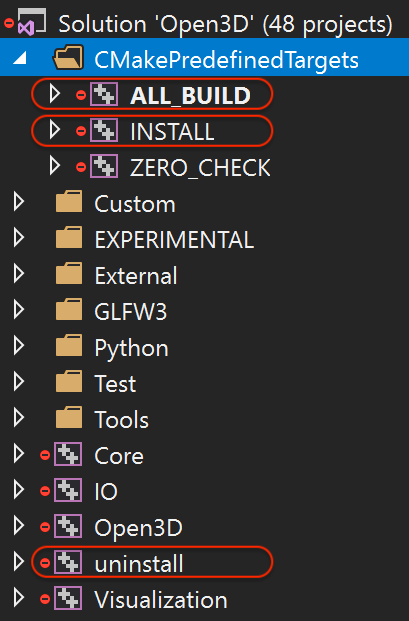
Open Open3D.sln file with Visual Studio, change the build type to
Release, then rebuild the ALL_BUILD target.

Alternatively, we can also build directly from the CMD terminal. Run
cmake --build . --parallel %NUMBER_OF_PROCESSORS% --config Release --target ALL_BUILD
5. Install
Open3D can be installed as a C++ library or a Python package, by building the corresponding targets with Visual Studio or from the terminal. E.g.
cmake --build . --parallel %NUMBER_OF_PROCESSORS% --config Release --target the-target-name
Here’s a list of installation related targets. Please refer to 5. Install for more detailed documentation.
installpython-packagepip-packageinstall-pip-package
Sanity check
For a quick sanity check, try importing the library from the Python interactive shell:
python

>>> import open3d
Error
If there is an issue, check whether the Python version detected by
CMake (see Found PythonInterp log from CMake, or check the value of the
PYTHON_EXECUTABLE CMake variable) and the Python version for command
line environment (type python -V). They should match. If it is not,
please follow 2. Setup Python binding environments in docs. In addition,
python binding issue
on Github repository has helpful notes from Open3D users.
Compilation Options
This page shows advanced options to customize the Open3D build. For quick start, see Compiling from source.
Dependencies
For each dependent library, there is a corresponding CMake build option
BUILD_<LIBRARY_NAME>. If the option is ON, the dependent library is
forced to be compiled from the source code included in 3rdparty folder. If
it is OFF, CMake will try to find system installed libraries and use it.
If CMake fails to find the dependent library, it falls back to compiling the
library from source code.
Tip
On Ubuntu and MacOS it is recommended to link Open3D to system installed
libraries. The dependencies can be installed via scripts
util/scripts/install-deps-ubuntu.sh and
util/scripts/install-deps-osx.sh. On Windows, it is recommended to
compile everything from source since Windows lacks a package management
software.
The following is an example of forcing building dependencies from source code:
cmake -DBUILD_EIGEN3=ON  \
      -DBUILD_GLEW=ON    \
      -DBUILD_GLFW=ON    \
      -DBUILD_JPEG=ON    \
      -DBUILD_JSONCPP=ON \
      -DBUILD_PNG=ON     \
      ..
Note
Enabling these build options may increase the compilation time.
OpenMP
We automatically detect if the C++ compiler supports OpenMP and compile Open3D
with it if the compilation option WITH_OPENMP is ON.
OpenMP can greatly accelerate computation on a multi-core CPU.
The default LLVM compiler on OS X does not support OpenMP.
A workaround is to install a C++ compiler with OpenMP support, such as gcc,
then use it to compile Open3D. For example, starting from a clean build
directory, run
brew install gcc --without-multilib
cmake -DCMAKE_C_COMPILER=gcc-6 -DCMAKE_CXX_COMPILER=g++-6 ..
make -j
Note
This workaround has some compatibility issues with the source code of
GLFW included in 3rdparty.
Make sure Open3D is linked against GLFW installed on the OS.
Unit test
To build unit tests, set BUILD_UNIT_TESTS=ON at CMake config stage. The unit test executable will be located at bin/unitTests in the build directory.
Please also refer to googletest for reference.
# In the build directory
cmake -DBUILD_UNIT_TESTS=ON ..
make -j
./bin/unitTests
Documentation
Documentation is written in
reStructuredText and compiled
with sphinx. From docs folder, run
pip install sphinx sphinx-autobuild sphinx-rtd-theme
make html
Documentation for C++ API is made with Doxygen.
Follow the Doxygen installation instruction.
From Open3D docs folder, run
doxygen Doxyfile